Github Actionsを使って、アプリケーションのビルドや自動テスト、インフラの構築をすることが多くなってきました。そして、どうしてもデプロイ先のネットワークと同一ネットワークからデプロイする必要があったために、Github Actions のセルフホストランナー(self-hosted runner)を構築しました。
private リポジトリでも無料で実行できる点も魅力です。
Github Actionsのセルフホストランナーの構築手順について、備忘録として残そうと思います。
環境
Self-hosted runner は、 Ubuntu 20.04 上にインストールしました。
※Docker等を使ってコンテナ上に構築する方法もあるようですが、手っ取り早くホスト上に構築しました。
| (構築時期) | 2022年1月 |
| self-hosted runner をインストールするOS | Ubuntu 20.04 LTS |
self-hosted runner のスコープ
私は、 Organization の Runner として self-hosted runner を構築しました。
Organization 用だけではなく、特定のリポジトリ用に self-hosted runner をインストールしたり、
複数のOrganizationを包含するエンタープライズ用に self-hosted runner をインストールすることも可能です。
You can add self-hosted runners at various levels in the management hierarchy:
- Repository-level runners are dedicated to a single repository.
- Organization-level runners can process jobs for multiple repositories in an organization.
- Enterprise-level runners can be assigned to multiple organizations in an enterprise account.
self-hosted runner のインストール
スクリプトを入手
Github のページでインストール用のスクリプトを表示させます。
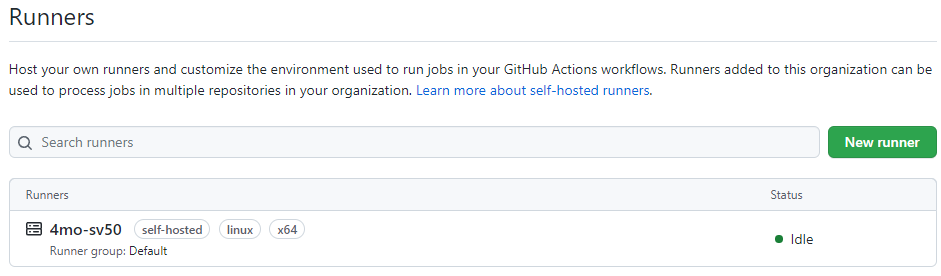
Organization の設定 > Actions > Runnersの画面で New runnerを選択します。
self-hosted runner のスコープによって、手順が異なります。
例えば、特定のリポジトリ用に self-hosted runner を構築したい場合は、リポジトリの設定画面 > Actions > Runners の画面を開きます。

Runner のOSやArchitectureを選択します。
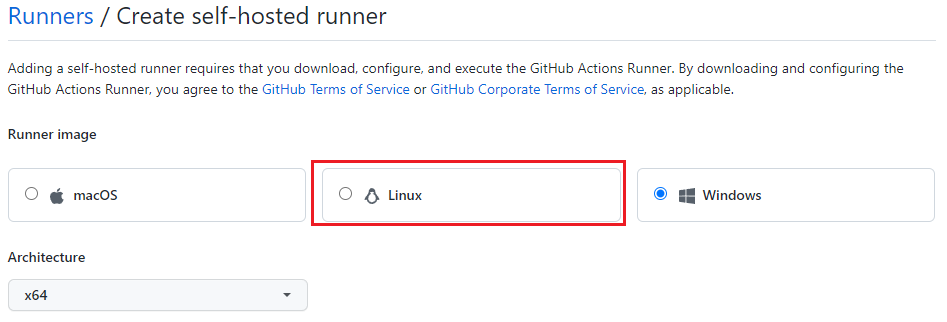
self-hosted runner をダウンロード
OSやArchitecture を選択すると、ダウンロードスクリプトが表示されるので、self-hosted runner をインストールする端末で実行します。
例としてスクリプトを載せていますが、Githubのページに記載されているスクリプトを実行してください。
# Create a folder
$ mkdir actions-runner && cd actions-runner
# Download the latest runner package
$ curl -o actions-runner-linux-x64-2.285.1.tar.gz -L https://github.com/actions/runner/releases/download/v2.285.1/actions-runner-linux-x64-2.285.1.tar.gz
# Optional: Validate the hash
$ echo "5fd98e1009ed13783d17cc73f13ea9a55f21b45ced915ed610d00668b165d3b2  actions-runner-linux-x64-2.285.1.tar.gz" | shasum -a 256 -c# Extract the installer
$ tar xzf ./actions-runner-linux-x64-2.285.1.tar.gz
設定
ダウンロード用スクリプトの下に、設定用スクリプトが表示されているので、同様に実行します。
例としてスクリプトを載せていますが、Githubのページに記載されているスクリプトを実行してください。
※以下の例では、--urlの末尾や--tokenの部分をマスクしています。
# Create the runner and start the configuration experience
$ ./config.sh --url https://github.com/xxxxxx --token xxxxxxxxxxxxxxxxxxxx

--------------------------------------------------------------------------------
|        ____ _ _   _   _       _          _        _   _                      |
|       / ___(_) |_| | | |_   _| |__      / \   ___| |_(_) ___  _ __  ___      |
|      | |  _| | __| |_| | | | | '_ \    / _ \ / __| __| |/ _ \| '_ \/ __|     |
|      | |_| | | |_|  _  | |_| | |_) |  / ___ \ (__| |_| | (_) | | | \__ \     |
|       \____|_|\__|_| |_|\__,_|_.__/  /_/   \_\___|\__|_|\___/|_| |_|___/     |
|                                                                              |
|                       Self-hosted runner registration                        |
|                                                                              |
--------------------------------------------------------------------------------

# Authentication


√ Connected to GitHub

# Runner Registration

Enter the name of the runner group to add this runner to: [press Enter for Default]

Enter the name of runner: [press Enter for 4mo-sv50]

This runner will have the following labels: 'self-hosted', 'Linux', 'X64'
Enter any additional labels (ex. label-1,label-2): [press Enter to skip]

√ Runner successfully added
√ Runner connection is good

# Runner settings

Enter name of work folder: [press Enter for _work]

√ Settings Saved.
runner の名前や label 、work folder を尋ねられますが、デフォルトのままにしました。
./run.shを実行します。
# Last step, run it!
$ ./run.sh

√ Connected to GitHub
Current runner version: '2.285.1'
2022-01-08 09:31:45Z: Listening for Jobs
成功すると Runners に表示されます。
サービスとして実行する
./run.shで実行するとターミナルが終了すると利用できなくなってしまいます。
また、サーバーの再起動の度に、./run.shを実行するのも面倒なので、サービスとして登録します。
./svc.sh コマンドの確認
./svc.shを実行すると利用可能なコマンドが表示されます。
$ sudo ./svc.sh

Usage:
./svc.sh [install, start, stop, status, uninstall]
Commands:
   install [user]: Install runner service as Root or specified user.
   start: Manually start the runner service.
   stop: Manually stop the runner service.
   status: Display status of runner service.
   uninstall: Uninstall runner service.
実行ユーザの作成
サービスとして登録する前に…、self-hosted runner の実行ユーザgithub-actionsを作成して、
actions-runner以下の所有者をgithub-actionsに変更します。
$ useradd github-actions

# 権限変更
$ cd actions-runner/
$ chown github-actions -R .
サービス登録
先ほど作成したユーザー github-actionsとして実行するようにサービスを登録します。
$ sudo ./svc.sh install github-actions

Creating launch runner in /etc/systemd/system/actions.runner.xxxxx.4mo-sv50.service
Run as user: github-actions
Run as uid: 1004
gid: 1004
Created symlink /etc/systemd/system/multi-user.target.wants/actions.runner.xxxxx.4mo-sv50.service → /etc/systemd/system/actions.runner.xxxxx.4mo-sv50.service.
サービス起動
./svc.shを使ってサービスを起動します。
$ sudo ./svc.sh start

/etc/systemd/system/actions.runner.xxxxx.4mo-sv50.service
● actions.runner.xxxxx.4mo-sv50.service - GitHub Actions Runner (xxxxx.4mo-sv50)
     Loaded: loaded (/etc/systemd/system/actions.runner.xxxxx.4mo-sv50.service; enabled; vendor preset: enabled)
     Active: active (running) since Sat 2022-01-08 18:31:39 JST; 16ms ago
   Main PID: 159034 (runsvc.sh)
      Tasks: 7 (limit: 629145)
     Memory: 2.5M
     CGroup: /system.slice/actions.runner.xxxxx.4mo-sv50.service
             ├─159034 /bin/bash /opt/github-actions-runner/runsvc.sh
             └─159036 ./externals/node12/bin/node ./bin/RunnerService.js
注意点
publicリポジトリでは決してセルフホストランナーを使用しないでください。
Pull request をトリガーとして悪意のあるコードがセルフホストランナー上で実行されてしまう可能性があります!
Self-hosted runners for GitHub do not have guarantees around running in ephemeral clean virtual machines, and can be persistently compromised by untrusted code in a workflow.
As a result, self-hosted runners should almost never be used for public repositories on GitHub, because any user can open pull requests against the repository and compromise the environment.
https://docs.github.com/ja/actions/security-guides/security-hardening-for-github-actions#hardening-for-self-hosted-runners
最後に
これで自前の環境でもGithub Actionsを実行できるようになりましたね。
self-hosted runner のセキュリティには十分に気を付けた上で、活用していきたいと思います!